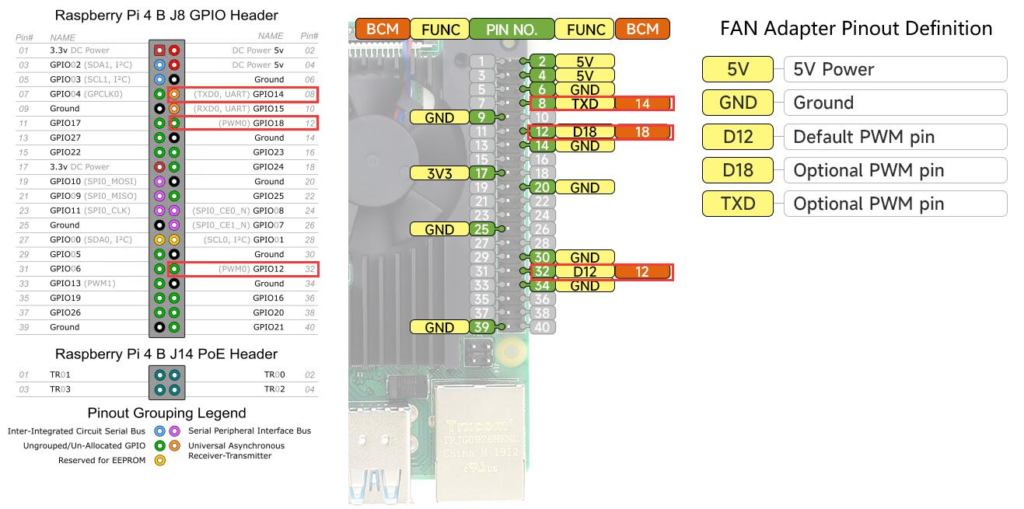
Connect the wires to Pi4B directly.

The PWM pin can be connected to TXD(GPIO14)/GPIO12/GPIO18.

4. Connect the wires to FAN Adapter.
When used with FAN Adapter, the default PWM pin is D12(GPIO12), You can switch to TXD or D18 by modifying the 0R resistor.

How to control fan speed
- Controlled by Raspberry Pi OS:
We assume you have a Raspberry Pi OS installed.
1. Connect the pins of the cooling fan to the Raspberry Pi or FAN Adapter. Make sure you have already connected the Red wire to 5V, the Black wire to the GND pin, and Blue Wire to PWM (can be connected to TXD(GPIO14)/GPIO 12/GPIO18).
2. Turn on Raspberry Pi and log in, open a terminal and enable Fan control as following Steps: Typing following command in terminal:sudo raspi-config
3. Navigate to Performance options
4. Navigate to Fan
5. Select yes
6. Input 12 means using GPIO12 as PWM output Pin.
If you connect to TXD(GPIO14),pls using GPIO14 as PWM output Pin.
7. Change the threshold trigger temperature to 60 degrees.
8. Confirm it.
9. Navigate to Finish and reboot Raspberry Pi as required to take effect.
Ayrıca
With your fan connected as shown you can’t control its speed because those are just the 5V power and ground pins,
if you want to control the fan speed you need to use a gpio pin and a transistor control circuit.
like this.

you can then either use your own software to control the fan speed or the option in raspi-config to turn the fan on/off depending on temperature.
İlk Yorumu Siz Yapın